Setup Production Deis Workflow on GKE, Part Two
This is part two of a two part series that walks you through a full production setup of Deis Workflow.
In part one, we set up off-cluster object storage, a Docker registry, and a Postgres platform database. We then installed Workflow on a Kubernetes cluster.
In this post, I will show you how to secure your cluster with SSL and get DNS set up for your Workflow domain. Finally, I will show you how to upgrade Workflow itself.
SSL for Workflow
Setting up SSL for Workflow ensures that all data passed between the Workflow controller and the CLI remains private.
To enable SSL for Workflow, you can add an SSL certificate to the Workflow router. You must provide either an SSL certificate that was registered with a third-party Certificate Authority (CA) or your own self-signed SSL certificate.
Note: The platform SSL certificate also functions as a default certificate for apps that are deployed via Workflow. If you would like to attach a specific certificate to an application and domain see the docs covering application SSL certificates.
Installing SSL on the Workflow Router
For this post, we are going to generate a self-signed SSL certificate.
In the following command, replace Country, State, City, OrgName, and example.com with the appropriate values:
$ openssl req \
    -newkey rsa:2048 -nodes -keyout tls.key \
    -x509 -days 3650 -out tls.crt \
    -subj "/C=Country/ST=State/L=City/O=OrgName/OU=IT Department/CN=example.com"
After you run this command, you should two files in your working directory: tls.crt and tls.key.
Now, create the Kubernetes deis-router-platform-cert secret:
$ kubectl --namespace=deis create secret generic \
    deis-router-platform-cert --from-file=tls.key --from-file=tls.crt
secret "deis-router-platform-cert" created
Once you've created the deis-router-platform-cert secret, the Workflow router will notice and automatically update its own configuration:
$ kubectl --namespace=deis logs deis-router-1536869610-o8d7e
2016-09-14 16:04:34.307893 I | INFO: Router configuration has changed in k8s.
2016-09-14 16:04:34.312750 I | INFO: Reloading nginx...
2016-09-14 16:04:34.317101 I | INFO: nginx reloaded.
Cloudflare SSL and DNS
Having a self-signed SSL certificate is great for securing Workflow, but let's improve things by putting Cloudflare in front of it. Cloudflare offers a number of security features, but the one we're most interested in here is an SSL certificate from a known CA. This means no pesky security warnings for your end users.
In this setup, traffic between Workflow and Cloudflare is secured by your self-signed certificate, and forward traffic to your end users is secured by Cloudflare.
Website
Firstly, create a free Cloudflare account.
Once that's done, select Add Site from the top bar:

Fill your domain name and click Begin Scan:

Then, follow the instructions and update your domain DNS records.
SSL Support
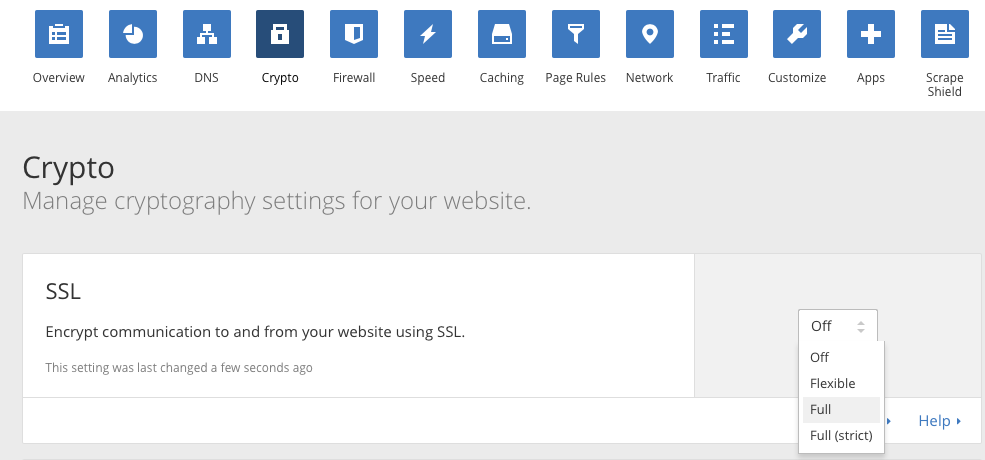
Once your DNS is set up you must enable SSL support.
Select Crypto from the top bar and change Off to Full under the SSL section:
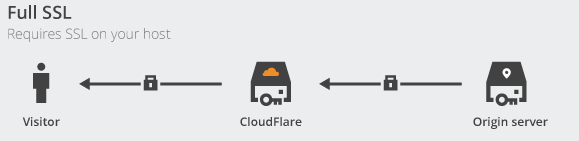
Setting SSL to Full allows you to use your self-signed SSL certificate. Once this is enabled, you can see that traffic is encrypted at every step:
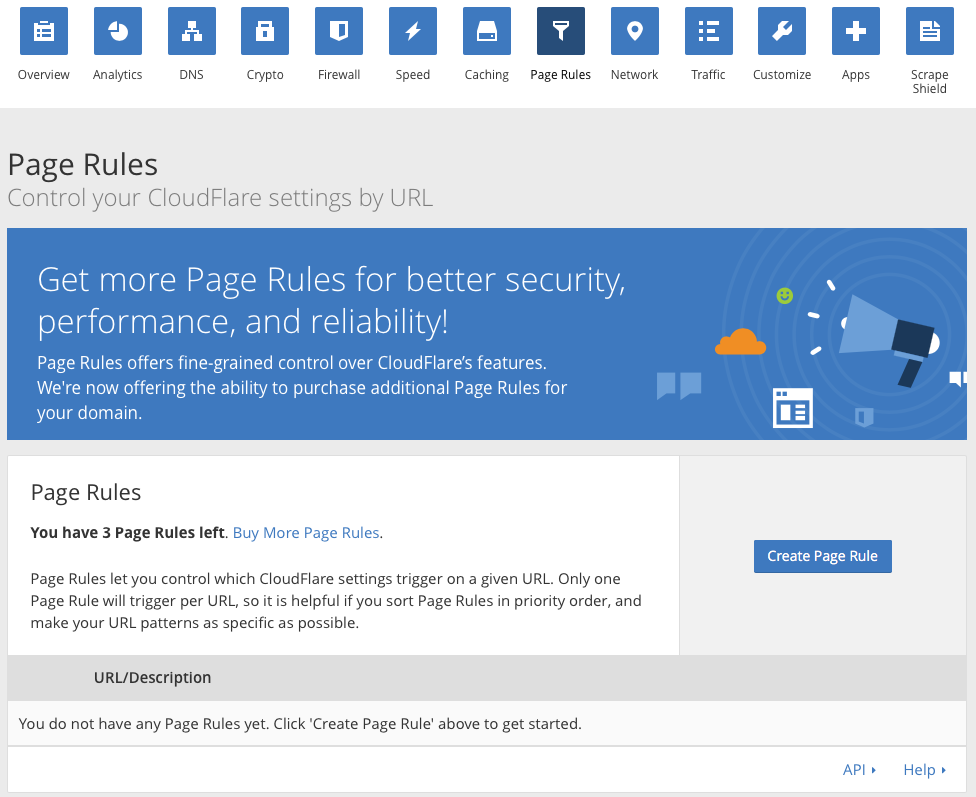
Page Rules
Next visit Page Rules and select Create Page Rule:
Add your domain, creating a page rule to forward all traffic to HTTPS:
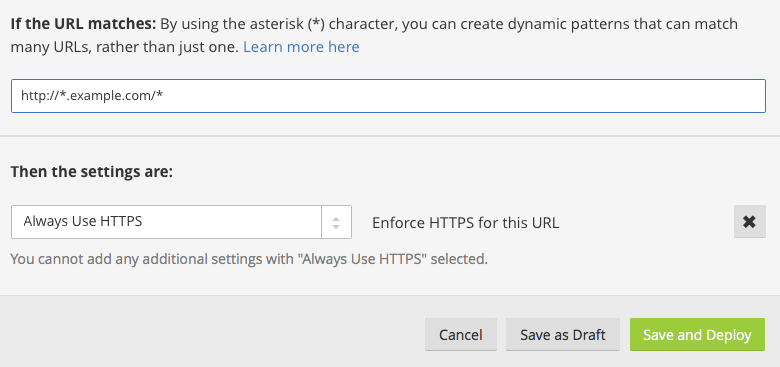
Select Save and Deploy and you are done for now.
DNS Records
Now you need to add your deis-router IP address to your DNS records on Cloudflare. This will allow you to then access Workflow components by subdomains.
Grab your deis-router IP address:
$ kubectl --namespace=deis get svc deis-router
NAME          CLUSTER-IP      EXTERNAL-IP     PORT(S)                            AGE
deis-router   10.95.253.175   130.211.65.52   80/TCP,443/TCP,2222/TCP,9090/TCP   3h
The IP address you're looking for is listed under the EXTERNAL-IP column. Here you can see it is 130.211.65.52.
Go back to Cloudflare and select DNS from the top bar:
On the screen that comes up, add three records:

The records are:
deis-builder: used as remote Git endpointdeis: the platform API for CLI usegrafana: to access Grafana remotely
Note: when doing this, you should change the default Grafana username and password for Grafana. See the docs for more info.
You can add other subdomains too if you want, e.g. www. They do not even have to point to Workflow hosted apps.
Enable the HTTPS proxy (toggle the orange cloud symbol) for deis and grafana subdomains. This will force SSL. You do not need to do this for deis-builder, as this service is only accessed via SSH.
If you are setting up subdomains for Workflow apps, you should configure forced HTTPS for them too. If you don't do this, end users will see an untrusted SSL certificate warning when trying to visit your app.
Once you've set up your subdomains, give it a few minutes for all the Cloudflare services to kick in before you proceed to the next section.
Set Up Workflow
Register With the Controller
To use Workflow, you must first register a user with the platform controller.
Use deis register with the controller URL to create a new admin user account.
Do that like so:
$ deis register https://deis.example.com
username: YOUR_USER
password:
password (confirm):
email: your_user@example.com
If the registration is successful you should see:
Registered YOUR_USER
Logged in as YOUR_USER
Configuration file written to /Users/user/.deis/client.json
Next you should secure Workflow by only allowing admin users to create new users. If you don't do this, the system will be open and anybody will be able to create users.
SSH Keys
You need to upload your SSH public key so you can use git push to deploy applications to Workflow.
If you do not have an SSH key you must generate one. This includes Google Cloud Shell users, as an SSH key does not come pre-generated.
You can generate an SSH key like so:
$ ssh-keygen -t rsa -b 4096 -C "your_user@example.com"
Press Enter to accept the default location and filename. You can then press Enter two more times if you want to use an empty passphrase. It's more secure to use a passphrase, but this decision is entirely up to you.
Once you're done, change the file permissions on your new SSH public key:
$ chmod 600 ~/.ssh/id_rsa.pub
Now, upload your SSH public key to Workflow:
$ deis keys:add
Found the following SSH public keys:
1) id_rsa.pub your_user@example.com
2) Enter path to pubfile (or use keys:add <key_path>)
Which would you like to use with Deis? 1
Uploading /Users/myuser/.ssh/id_rsa.pub to Deis... done
Now that's done, you're ready to start deploying some apps!
I won't go over how to deploy apps to Workflow, because I've covered that before on the Deis blog. Check out this quick overview covering the different ways to deploy to Workflow, with some example videos. Or check out this more detailed three-part guide to both Workflow and Workflow app deployment.
Let's take a look at how to upgrade Workflow.
Workflow Upgrade
Deis Workflow releases may be upgraded in-place with a minimal downtime.
The upgrade process requires:
- Helm Classic, version 0.8.1 or newer
- Configured off-cluster storage and platform database (I showed you how to do this in part one)
- A copy of the Kubernetes builder secrets from your running cluster (which I will show you how to get)
Prepare Configuration
First, export environment variables for the previous and latest Workflow versions. This will help reduce confusion later on.
$ export PREVIOUS_WORKFLOW_RELEASE=v2.5.0
$ export NEW_WORKFLOW_RELEASE=v2.6.0
Modify the above to suit your setup.
Now, fetch a copy of the new Workflow chart, like so:
$ helmc fetch deis/workflow-${NEW_WORKFLOW_RELEASE}
This puts the chart into the helmc workspace for further customization.
The first time Workflow is installed, Helm automatically generates Kubernetes secrets for the builder and database Workflow components. You need to rescue these from your current chart and re-apply them to your new chart.
Fetch the current database credentials:
$ kubectl --namespace=deis get secret database-creds -o yaml > ~/active-deis-database-secret-creds.yaml
Fetch the builder SSH keys:
$ kubectl --namespace=deis get secret builder-ssh-private-keys -o yaml > ~/active-deis-builder-secret-ssh-private-keys.yaml
You now have the important Kubernetes secrets saved on your local workstation. You will copy them into place in the next step.
Modify and Update Configuration
Before generating the manifests for the newest Workflow install, you should update the new generate_params.toml file (which I cover in part one) to match the configuration used with the previous Workflow install. Specifically pay attention to the registry, object storage, and platform database sections.
Edit your previous generate_params.toml file here:
$(helmc home)/workspace/charts/workflow-${PREVIOUS_WORKFLOW_RELEASE}/tpl/generate_params.toml
Edit your new generate_params.toml file here:
$(helmc home)/workspace/charts/workflow-${NEW_WORKFLOW_RELEASE}/tpl/generate_params.toml
You should not just copy the old generate_params.toml file across, because the new Workflow release may have added, removed, or changed some things.
Once you're done, generate templates for the new release like so:
$ helmc generate -x manifests workflow-${NEW_WORKFLOW_RELEASE}
Now you can copy your Kubernetes secrets into place.
Copy your database credentials like so:
$ cp ~/active-deis-database-secret-creds.yaml \
    $(helmc home)/workspace/charts/workflow-${NEW_WORKFLOW_RELEASE}/manifests/deis-database-secret-creds.yaml
Copy your builder SSH keys like so:
$ cp ~/active-deis-builder-secret-ssh-private-keys.yaml \
    $(helmc home)/workspace/charts/workflow-${NEW_WORKFLOW_RELEASE}/manifests/deis-builder-secret-ssh-private-keys.yaml
Everything is now set for you to apply the Workflow upgrade.
Apply the Workflow Upgrade
Helm Classic will remove all components from the previous release that are not marked as keepers. As of Workflow 2.3 and later, the controller, registry, and router are marked as keepers and will be left in-service.
Traffic to applications deployed through Workflow will continue to flow between the uninstall and install commands.
If Workflow is not configured to use off-cluster Postgres, the Workflow API will experience a brief period of downtime while the database component recovers from backup.
Uninstall Workflow like so:
$ helmc uninstall workflow-${PREVIOUS_WORKFLOW_RELEASE} -n deis
Install of latest Workflow release like so:
$ helmc install workflow-${NEW_WORKFLOW_RELEASE}
Done!
Verify Upgrade
Wait a few minutes and then verify that all components have started and have passed their readiness checks:
$ kubectl --namespace=deis get pods
NAME                                             READY     STATUS    RESTARTS   AGE
deis-builder-2877794856-er51y                    1/1       Running   0          1m
deis-controller-1398787415-jhrff                 1/1       Running   0          1m
deis-logger-fluentd-d53lz                        1/1       Running   0          1m
deis-logger-fluentd-gnf7l                        1/1       Running   0          1m
deis-logger-fluentd-v3444                        1/1       Running   0          1m
deis-logger-n6kt3                                1/1       Running   3          1m
deis-logger-redis-pjebp                          1/1       Running   0          1m
deis-monitor-grafana-bz503                       1/1       Running   0          1m
deis-monitor-influxdb-a77i5                      1/1       Running   0          1m
deis-monitor-telegraf-8sx67                      1/1       Running   0          1m
deis-monitor-telegraf-d7iv1                      1/1       Running   0          1m
deis-monitor-telegraf-h9lhx                      1/1       Running   0          1m
deis-nsqd-kzee4                                  1/1       Running   0          1m
deis-registry-token-refresher-2960837778-g3nqp   1/1       Running   0          1m
deis-router-1715979499-uan24                     1/1       Running   0          1m
deis-workflow-manager-2972479182-i1nty           1/1       Running   0          1m
Awesome job. Workflow has been upgraded to the latest version.
Wrap up
In this post we learnt how to:
- Secure Workflow with SSL and DNS
- Register an admin user with the platform
- Perform a platform upgrade
If all of this seems a bit involved, do not fret. Now you've done it the hard way, check out my deis-workflow-gke script which automates most of this for you.
