Introduction to Kubernetes, Part One
Kubernetes is an open-source system for managing containerized applications across multiple hosts in a cluster.
Kubernetes provides mechanisms for application deployment, scheduling, updating, maintenance, and scaling. A key feature of Kubernetes is that it actively manages the containers to ensure the state of the cluster continually matches the user's intentions.
Kubernetes enables you to respond quickly to customer demand by scaling or rolling out new features. It also allows you to make maximal use of your hardware.
Kubernetes is:
- Lean: lightweight, simple, accessible
- Portable: public, private, hybrid, multi cloud
- Extensible: modular, pluggable, hookable, composable, toolable
- Self-healing: auto-placement, auto-restart, auto-replication
Kubernetes builds on a decade and a half of experience at Google running production workloads at scale, combined with best-of-breed ideas and practices from the community.
Kubernetes supports Docker and rkt containers, with more container types to be supported in a future.
In this miniseries, we’ll cover Kubernetes from the ground up.
Let’s start with the basic components.
kubectl
The kubectl utility lets you interface with the Kubernetes cluster manager. For example, you can add and delete nodes, pods, replication controllers, and services. You can also check their status, and so on.
For more information, see the documentation.
Cluster
A cluster is a set of physical or virtual machines (or both) combined with other infrastructure resources used by Kubernetes to run your applications.
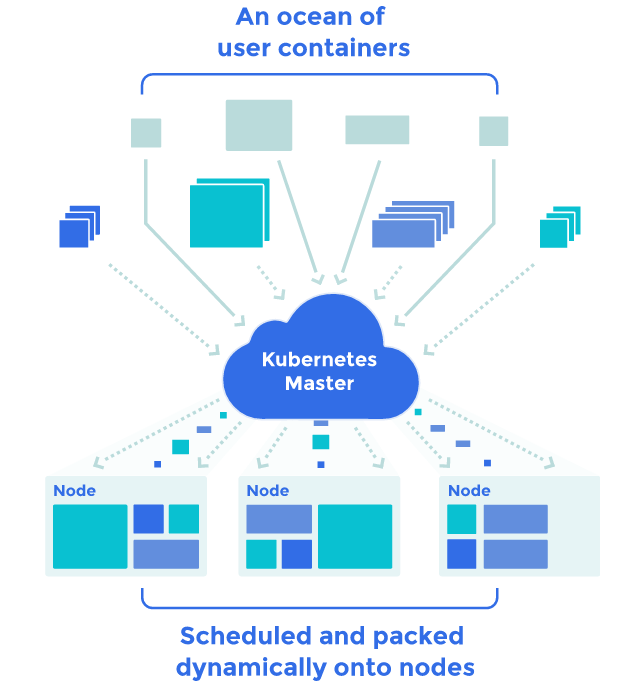
In the following diagram, we can see how a heterogeneous set of user-specified containers are neatly and automatically packed into the available nodes by Kubernetes.

We can get basic information about the cluster with the cluster-info command.
Here's an example:
$ kubectl cluster-info
Kubernetes master is running at http://172.19.17.99:8080
Kube-dns is running at http://172.19.17.99:8080/api/v1/proxy/namespaces/kube-system/services/kube-dns
KubeUI is running at http://172.19.17.99:8080/api/v1/proxy/namespaces/kube-system/services/kube-ui
Control Plane
The Kubernetes control plane is split into a set of components. These components work together to provide a unified view of the cluster.
etcd
All persistent state data is stored an etcd cluster. This provides a distributed way to store configuration data reliably.
Master Services
The master services are the set of main Kubernetes control services, usually running on one server. If high availability is needed, they can be run on a multiple servers behind a load balancer.
The master services are as follows:
-
The API server is the central management point of the entire cluster, and allows the admin to configure Kubernetes workloads and organizational units. The API server is also responsible for making sure etcd and the service details of deployed containers are in agreement.
In other words, the API server validates and configures (on command) the data for pods, services, and replication controllers. It also assigns pods to nodes and synchronizes pod information with service configuration.
-
The controller manager service handles the replication processes defined by individual replication tasks. The details of these operations are written to etcd, which the controller manager watches for changes. When a change is seen, the controller manager reads the information and implements the replication procedure that fulfills the desired state, e.g. scaling the application group up or down.
In other words, the controller manager watches etcd for replication tasks and uses the API to enforce the desired state.
-
The scheduler assigns workloads to specific nodes in the cluster. It does this by reading in the workload operating requirements, analyzing the current environment (i.e. the health and operational details of the individual nodes in the cluster), and then placing the workload on a suitable node, or nodes.
Nodes
A node (sometimes called a worker node) is a physical or virtual machine running Kubernetes services, onto which pods can be scheduled.
Nodes are managed by the control plane.
These Kubernetes services usually run on each node:
-
The kubelet daemon is the primary agent that runs on each node. The kubelet daemon watches the master API server and ensures the appropriate local containers are started, remain healthy, and continue to run.
-
The kube-proxy daemon runs on each node as a simple network proxy and load balancer for the services on that node.
You can get a list of nodes by running:
$ kubectl get nodes
NAME          LABELS                               STATUS
172.19.17.99  kubernetes.io/hostname=172.19.17.99  Ready
Configuration Files
Kubernetes defines its constructs through configuration files (called manifests) which can be either YAML or JSON.
Namespace
A namespace is like a prefix to the name of a resource. Namespaces help different projects, environments (e.g. dev and production), teams, or customers share the same cluster. It does this by preventing name collisions.
Namespace can be created with a manifest file.
Create a file called development-ns.yaml and put this in:
kind: "Namespace"
apiVersion: "v1"
metadata:
  name: "development"
  labels:
    name: "development"
Then you can create the new namespace by running:
$ kubectl create -f development-ns.yaml
namespaces/development
And to list existing namespaces, run:
$ kubectl get namespaces
NAME         LABELS            STATUS
default      <none>            Active
development  name=development  Active
For more information about namespaces, see the documentation.
Pods
Pods are a collocated group of application containers with shared volumes.
Pods are the smallest deployable units that can be created, scheduled, and managed with Kubernetes. Pods can be created individually. As pods do not have a managed lifecycle, if they die, they will not be recreated. For that reason, it is recommended that you use a replication controller (which we cover later) even if you are creating a single pod.
The applications in the pod all use the same network namespace, IP address, and port space. And they can find and communicate with each other using localhost. Each pod has an IP address in a flat shared networking namespace that has full communication with other physical computers and containers across the network.
Let's create a simple pod definition for a single nginx web container.
Create a file named nginx.yaml, and put this in it:
apiVersion: v1
kind: Pod
metadata:
  name: nginx
spec:
  containers:
  - name: nginx-server
    image: nginx
    ports:
    - containerPort: 80
In this file:
Nameis the name you give to your containerimageis the Docker image name you want to usecontainerPortexposes the specified container port so we can connect to the nginx server at the pod’s IP address
By default, the entrypoint defined in the image is what will run. With our nginx image, that command runs nginx.
Let’s create the pod by running:
$ kubectl create -f nginx.yaml
pods/nginx
Easy as that!
You can check this worked by running:
$ kubectl get pods
NAME   READY  STATUS   RESTARTS  AGE
nginx  1/1    Running  0         1m
Bingo. Here, we can see the nginx pod we created. It's one minute old.
We can also check the resources for our running pod:
$ kubectl describe pod nginx
Name:                       nginx
Namespace:                  default
Image(s):                   nginx
Node:                       172.19.17.99/172.19.17.99
Labels:                     <none>
Status:                     Running
Reason:
Message:
IP:                         10.244.3.2
Replication Controllers:    <none>
Containers:
  nginx:
    Image:          nginx
    State:          Running
      Started:      Sat, 29 Aug 2015 18:23:15 +0100
    Ready:          True
    Restart Count:  0
Conditions:
  Type      Status
  Ready     True
And we can delete our pod:
$ kubectl delete pod nginx
pods/nginx
See, it worked:
$ kubectl get pods
NAME   READY  STATUS   RESTARTS  AGE
For more information about Pods, see the documentation.
Replication controllers
Replication controllers manage the lifecycle of pods. They insure a specified number of specific pods are running at any given time. They do this by creating or deleting pods as required. For this reason, it's recommended you use a replication controller even if you are creating a single pod.
Let’s create the replication controller for our previously used nginx pod.
Create the nginxrc.yaml file, and put this in it:
apiVersion: v1
kind: ReplicationController
metadata:
  name: my-nginx
spec:
  replicas: 1
  template:
    metadata:
      labels:
        app: nginx
    spec:
      containers:
      - name: nginx
        image: nginx
        ports:
        - containerPort: 80
Now create the replication controller from that file:
$ kubectl create -f nginxrc.yaml
replicationcontrollers/my-nginx
We can see how many replicas we have:
$ kubectl get rc
CONTROLLER  CONTAINER(S)  IMAGE(S)  SELECTOR   REPLICAS
my-nginx    nginx         nginx     app=nginx  1
And we can easily scale pods:
$ kubectl scale --replicas=3 rc my-nginx
And check it worked:
$ kubectl get rc
CONTROLLER  CONTAINER(S)  IMAGE(S)  SELECTOR   REPLICAS
my-nginx    nginx         nginx     app=nginx  3
Here we see the replication controller has scaled from one to three pod replicas.
The replication controller will now ensure that number of replicas will be run at all times.
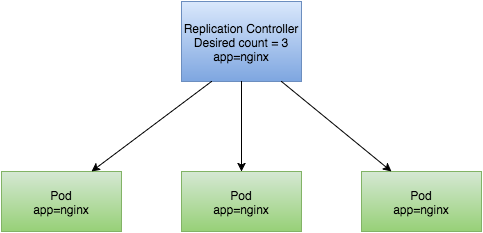
Here's how our replication controller functions:

As you can see, it knows there are three pods with the label nginx. And it watches over those pods, ready to recreate one if necessary.
For more information about replication controllers, see the documentation.
Services
Services provide a single stable name and address for a set of pods. They act as basic load balancers.
Most pods are designed to be long-running, but once the single process dies, the pod dies with it. If it dies, the replication controller replaces it with a new pod. Every pod gets its own dedicated IP address, which allows containers to have the same port, even if they're sharing the same host. But every time pod is started by the replication controller, the pod gets a new IP address.
This is where services really help. A service is attached to a replication controller. Each service gets assigned a virtual IP address, which remains constant. As long as we know the service IP address, the service itself will keep track of the pods created by the replication controller, and will distribute requests to them.
Let's create a service for our my-nginx replication controller.
Create a file called nginxsvc.yaml, and put this in:
apiVersion: v1
kind: Service
metadata:
  name: nginxsvc
  labels:
    app: nginx
spec:
  ports:
  - port: 80
    protocol: TCP
  selector:
    app: nginx
Now, we can create our service by running:
$ kubectl create -f nginxsvc.yaml
And check it worked:
$ kubectl get svc nginxsvc
NAME      LABELS     SELECTOR   IP(S)          PORT(S)
nginxsvc  app=nginx  app=nginx  10.100.168.74  80/TCP
Because every node in a Kubernetes cluster runs a kube-proxy, the kube-proxy watches the Kubernetes API server for the addition and removal of services. For each new service, kube-proxy opens a (randomly chosen) port on the local node. Any connections made to that port are proxied to one of the corresponding backend pods.
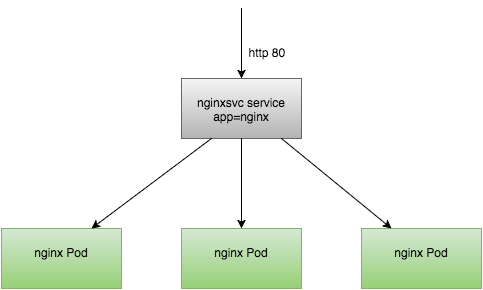
Here's how our nginxsvc service functions:

As you can see, incoming requests to HTTP port 80 arrive at the nginxsvc service and are proxied to one of the three nginx pods.
For more information about services, see the documentation.
Labels
Labels are used to organize and select groups of objects based on key-value pairs.
They are used by every Kubernetes component. For example: the replication controller uses them for service discovery.
Let’s see how labels are used to connect the replication controller my-nginx with the nginxsvc service.
The my-nginx replication controller config includes this:
...
 metadata:
   labels:
     app: nginx
...
The app label is set to nginx.
That label is used by our nginxsvc service config:
...
  selector:
    app: nginx
...
This label then functions to connect the service to the replication controller.
You can see which selector a service is using like so:
$ kubectl get svc nginxsvc
NAME      LABELS     SELECTOR   IP(S)          PORT(S)
nginxsvc  app=nginx  app=nginx  10.100.168.74  80/TCP
For more information about Labels, see the documentation.
Wrap Up
In part one of this Kubernetes miniseries, we looked at kubectl, clusters, the control plane, namespaces, pods, services, replication controllers, and labels.
In part two, we’ll look at volumes, secrets, rolling updates, and Helm.