How to use Google Cloud Filestore with GKE
Recently Google announced high-performance, fully managed file storage for applications that require a file system interface and a shared file system.
The it is available as beta feature and you can try it now.
Pre-Requisites
You need to have GKE cluster available, if you don't have it, follow official GKE docs to set it up.
Helm is installed to your GKE cluster.
Cloud Filestore instance
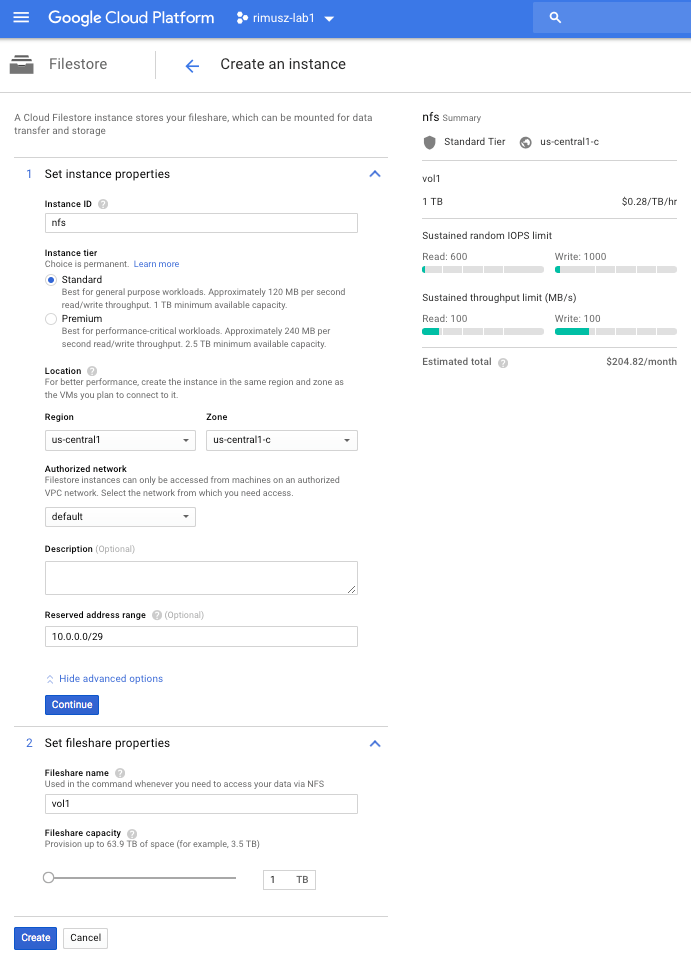
Now we are going to create Cloud Filestore instance.
We can do it via GCP Cloud Console:
Or via cli:
$ gcloud beta filestore instances create nfs \
  --location=us-central1-c --tier=STANDARD \
  --file-share=name="vol1",capacity=1TB \
  --network=name="default",reserved-ip-range="10.0.0.0/29"
Let's list Cloud Filestore instances:
$ gcloud beta filestore instances list
INSTANCE_NAME LOCATION       TIER      CAPACITY_GB  VOLUME_NAME  IP_ADDRESS  STATE  CREATE_TIME
nfs           us-central1-c  STANDARD  1024         vol1         10.0.0.2    READY  2018-07-01T15:49:39
Take a note of the Cloud Filestore instance IP which we will need later on.
I would recommend creating Cloud Filestore instance in the same availability zone as your GKE cluster, because networking is free in the same zone, and cross zone standard egress networking charges apply.
NFS Client Provisioner
To make an easy NFS PVCs provisioning we are going to use NFS Client Provisioner. This provisioner is intended for connecting to a pre-existing NFS server and is able to create/delete PVCs.
As I love using Helm for everything which needs to be installed to Kubernetes cluster, I made NFS Client Provisioner Helm chart for an easy way to create PVCs based on Cloud Filestore NFS.
First you need to add my Chart repo to Helm:
$ helm repo add rimusz https://helm-charts.rimusz.net
$ helm repo up
Let's install nfs-client-provisioner chart (update IP with your Cloud Filestore instance one):
$ helm install --name nfs-us-central1-c rimusz/nfs-client-provisioner --namespace nfs-storage \
  --set nfs.server="10.0.0.2" --dry-run --debug
You should get output as this:
NAME:   nfs-us-central1-c
LAST DEPLOYED: Sun Jul  1 17:06:13 2018
NAMESPACE: nfs-storage
STATUS: DEPLOYED

RESOURCES:
==> v1/StorageClass
NAME  PROVISIONER                                             AGE
nfs   cluster.local/nfs-us-central1-c-nfs-client-provisioner  1s

==> v1beta2/Deployment
NAME                                      DESIRED  CURRENT  UP-TO-DATE  AVAILABLE  AGE
nfs-us-central1-c-nfs-client-provisioner  1        1        1           0          1s

==> v1/Pod(related)
NAME                                                       READY  STATUS             RESTARTS  AGE
nfs-us-central1-c-nfs-client-provisioner-67548bb756-kw6bp  0/1    ContainerCreating  0         1s


NOTES:
The NFS Client Provisioner deployment has now been installed.

A storage class named 'nfs' has now been created
and is available to provision dynamic volumes.

You can use this storageclass by creating a `PersistentVolumeClaim` with the
correct storageClassName attribute. For example:

    ---
    kind: PersistentVolumeClaim
    apiVersion: v1
    metadata:
      name: test-claim
      annotations:
        volume.beta.kubernetes.io/storage-class: "nfs"
    spec:
      accessModes:
        - ReadWriteMany
      resources:
        requests:
          storage: 5Mi
Let's test your NFS provisioner installing PVC first:
cat <<EOF | kubectl create -f -
kind: PersistentVolumeClaim
apiVersion: v1
metadata:
  name: test-claim
  annotations:
    volume.beta.kubernetes.io/storage-class: "nfs"
spec:
  accessModes:
    - ReadWriteMany
  resources:
    requests:
      storage: 5Mi
EOF
Check that PV/PVC were created:
$ kubectl get pv
NAME                                       CAPACITY   ACCESS MODES   RECLAIM POLICY   STATUS     CLAIM                                            STORAGECLASS       REASON    AGE
pvc-10e0b6a3-7d4a-11e8-a199-42010a84004e   5Mi        RWX            Delete           Bound      default/test-claim                               nfs                          18s
$ kubectl get pvc
NAME         STATUS    VOLUME                                     CAPACITY   ACCESS MODES   STORAGECLASS   AGE
test-claim   Bound     pvc-10e0b6a3-7d4a-11e8-a199-42010a84004e   5Mi        RWX            nfs            32s
And then the test-pod:
cat <<EOF | kubectl create -f -
kind: Pod
apiVersion: v1
metadata:
  name: test-pod
spec:
  containers:
  - name: test-pod
    image: gcr.io/google_containers/busybox:1.24
    command:
      - "/bin/sh"
    args:
      - "-c"
      - "touch /mnt/SUCCESS && exit 0 || exit 1"
    volumeMounts:
      - name: nfs-pvc
        mountPath: "/mnt"
  restartPolicy: "Never"
  volumes:
    - name: nfs-pvc
      persistentVolumeClaim:
        claimName: test-claim
EOF
We need to check in PVC folder on your Cloud Filestore instance for the file SUCCESS.
As we cannot ssh to Cloud Filestore instance create the f1-micro instance and ssh there and run the commands below to install NFS client:
sudo apt-get -y update
sudo apt-get -y install nfs-common
sudo mkdir /mnt/test
sudo mount 10.0.0.2:/vol1 /mnt/test
Now we can check if the PVC folder is created there:
$ ls -alh /mnt/test
total 28K
drwxr-xr-x 4 root root 4.0K Jul  1 16:16 .
drwxr-xr-x 3 root root 4.0K Jul  1 16:25 ..
drwxrwxrwx 2 root root 4.0K Jul  1 16:16 default-test-claim-pvc-10e0b6a3-7d4a-11e8-a199-42010a84004e
drwx------ 2 root root  16K Jul  1 15:51 lost+found
Let's check for the file SUCCESS there:
$ ls -alh /mnt/test/default-test-claim-pvc-10e0b6a3-7d4a-11e8-a199-42010a84004e
total 8.0K
drwxrwxrwx 2 root root 4.0K Jul  1 16:29 .
drwxr-xr-x 4 root root 4.0K Jul  1 16:16 ..
-rw-r--r-- 1 root root    0 Jul  1 16:20 SUCCESS
Yay!!!
Now, let's delete the pod and PVC:
$ kubectl delete pod test-pod
pod "test-pod" deleted

$ kubectl delete pvc test-claim
persistentvolumeclaim "test-claim" deleted
And let's check that PVC folder got renamed to archived-???:
$ ls -alh /mnt/test/
total 28K
drwxr-xr-x 4 root root 4.0K Jul  1 16:32 .
drwxr-xr-x 3 root root 4.0K Jul  1 16:25 ..
drwxrwxrwx 2 root root 4.0K Jul  1 16:29 archived-default-test-claim-pvc-10e0b6a3-7d4a-11e8-a199-42010a84004e
drwx------ 2 root root  16K Jul  1 15:51 lost+found
Nice.
Wrap Up
In this blog post we learned how to create Cloud Filestore instance, access it from GKE with the help of NFS Client Provisioner. With the help of NFS Client Provisioner makes it so easy to create/delete PVCs there.
